Thinking about adding extra storage space to your home? Installing an attic ladder can be a great DIY project that not only enhances accessibility but also maximizes your attic’s potential. However, before you dive in, it’s crucial to understand the process and potential challenges you might face along the way. In this guide, we’ll walk you through the steps of DIY attic ladder installation, provide useful tips and tricks, and discuss when it might be best to consider hiring a professional installer.
Step 1: Gather Your Tools and Materials
Before you start the installation process, make sure you have all the necessary tools and materials on hand. This typically includes a drill, screwdriver, hammer, tape measure, level, saw, safety goggles, gloves, and of course, your attic ladder kit.
Step 2: Measure Twice, Cut Once
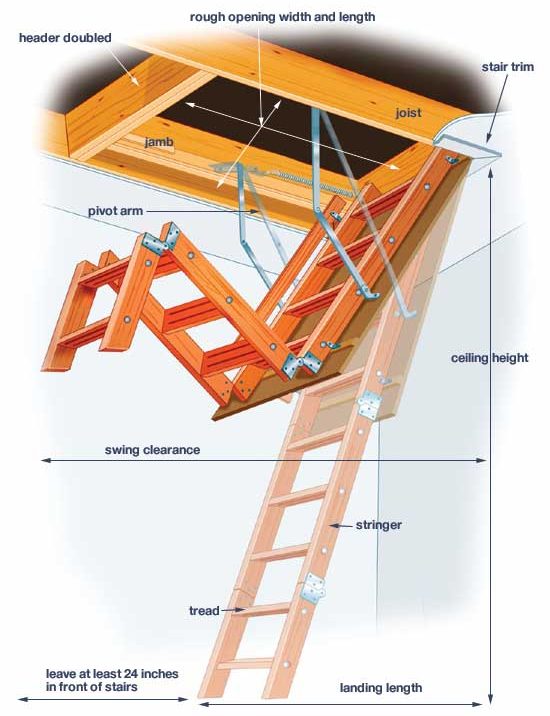
One of the most critical steps in installing an attic ladder is accurately measuring the rough opening in your ceiling. Failure to measure correctly can result in a misfit, leading to structural issues and potential safety hazards.
Step 3: Follow the Instructions Carefully
Each attic ladder kit comes with its own set of installation instructions. It’s essential to read and follow these instructions meticulously to ensure proper installation. Skipping steps or improvising can lead to costly mistakes down the line.
Step 4: Watch Out for Wiring and Plumbing
Before cutting into your ceiling, be sure to check for any electrical wiring or plumbing pipes that may be hidden behind the drywall. Cutting into these can cause serious damage and pose safety risks.
Step 5: Know When to Call in the Pros
While DIY attic ladder installation can be a rewarding project, it’s not without its challenges. If you encounter any of the following issues, it may be best to consider hiring a professional installer:
- Structural Concerns: If you’re unsure about the structural integrity of your ceiling or attic, it’s best to consult with a professional who can assess the situation and make any necessary reinforcements.
- Complex Installations: If your attic has unique features or obstacles such as HVAC ducts or chimney stacks, navigating around these can be tricky and may require specialized knowledge and equipment.
- Time Constraints: DIY projects often take longer than anticipated, especially if you encounter unexpected challenges along the way. If you’re short on time or patience, hiring a professional installer can save you valuable time and frustration.
In conclusion, DIY attic ladder installation can be a rewarding and cost-effective way to enhance your home’s storage space. However, it’s essential to approach the project with caution and know when it’s best to call in the pros. By following our step-by-step guide and keeping these tips in mind, you can successfully install an attic ladder that provides convenient access to your attic for years to come.